Scrivener is a software program created by a company called Literature and Latte. It’s a word-processing application that offers a lot more than just a simple replacement for Word. I don’t even think of Scrivener as a Word replacement but as a complementary tool.
What Is Scrivener?
![]() Scrivener allows you to organize your writing and structure it from the high-level idea to the smallest writing units. You can split your work down into scenes or even beyond that. Its usage is subjective to people’s liking, but the system is flexible enough to make it the go-to tool for many writers.
Scrivener allows you to organize your writing and structure it from the high-level idea to the smallest writing units. You can split your work down into scenes or even beyond that. Its usage is subjective to people’s liking, but the system is flexible enough to make it the go-to tool for many writers.
I’ve been using Scrivener for about eight years, and I’m thrilled with it. Over time, I’ve learned how to use it more effectively, and I’ve developed my own rules that work for me. In this short blog post, I will discuss some of those rules and best practices. Remember, these are working for me. They might not work for you, but they will give you an idea of what is possible.
The good thing about Scrivener is that it works regardless if you are an outliner or a seat-of-your-pants writer. In the end, you will have a properly organized final draft that is ready for self-editing. At the editing stage, you want to have your manuscript in a good place, with a good structure, and with the ability to go from section to section without losing a lot of time.
And that’s a critical part. As a writer, you’d like to spend most of your time writing and some of your time editing. But it’s the admin tasks and repetitive actions such as scrolling and searching that suck up a lot of your writing time.
One tiny caveat about this article is using and showing the Windows PC version in this tutorial. If you use Scrivener for Mac, most steps are very similar.
Getting Organized with Scrivener
Before I work on my manuscript, I always create my top-level structure: the categories, tags, and colors I will use. Create these first to take the guesswork out for later.
I use the three-act structure a lot, but you don’t have to. Regardless of how you structure your story, you can apply the same logic to it. To separate my sections, I create three Chapter labels (to access labels, click on the menu Project -> Meta-Data Settings… or press Ctrl-Shift-M.)
As you can see below, I have three chapters in three different colors. To edit the color, double-click the color square. I use my own outlining tool called Master Novel Outlining and Tracking Tool, and in there, I use the same color scheme for the three acts. This makes it easy to keep your work consistent with the different tools.
As you can see below, I have two types of scenes: Minor Scene and Major Scene. You can create your own labels here, but keep in mind that it complicates things if you create too many. I like to stick with two.
Note the Separator label there – we will talk about this a little later.

Once you define your Labels and colors, head on to the Status tab in the same settings window and ensure you have the status set for each of your sections. I use To Do, First Draft, Revised Draft, and Final Draft.

Top-Level Organization
Now that you have created your colors and names, it’s time to work on your chapter structure. Again, if you are an outliner, you already know this. If you’re not, this will build up slowly as you write.
To edit each chapter’s attributes, make sure that the Info Panel is visible on the right side of your screen. If it’s not, click on the large [i] icon there, and you can see the General Meta-Data for the selected chapter:
Below is an example of how my Chapter structure looks for my novel “The Silver Spider Web.” You can see how the colors allow the three-act structure to appear pretty clearly. Note that, by default, you might not see the tabs colored. If you don’t, click on the menu option View -> Use Label Color In and make sure to check the Icons option (you can also toggle it with the key F6).


You can also press F5 to show the Binder colors as a full-width colorful band, but I find it too distracting. This is how it looks like:

Scene Level
Now that you have your chapters on, it’s time to add scenes. Let me make a parenthesis here. Sometimes you need to have a separator between scenes. If you write fully contained scenes, you can use Scrivener’s built-in scene separator. But if you don’t, you’ll find it annoying. I wish there were a checkbox at the scene level that would allow us to toggle the separator on and off. Because there isn’t, I’m using my own system. Here’s how to do it.
First, eliminate Scrivener’s built-in separator.
Click on the Compile button:

Which opens the Compile window. Click on Separators and change the first one (Text Separator) to Single Return:

Then, create a text section between any two sections you want to separate, name it “——————–,” and set its Label to Separator. The section’s body text should be one carriage return, three “#” centered, and one more carriage return. Then, set its meta-data to be “Compile as is.” Here’s an example:

Now, every time you want to put a separator between two scenes, right-click the separator text and choose Duplicate. Then drag it to where it has to go. This will add a nice separator between the scenes you want to separate, and you don’t have to worry about how and when the system does it.
Also, don’t forget to classify your scenes with labels. As you can see in the sample above, I have tagged major scenes with red and minor scenes with purple.
Corkboard
The corkboard is a cool visual of your organized work, and I recommend using it. To switch to the corkboard view, click on the middle button on the top bar:

Before you fumble with the cards, click on the bottom-right button to open the cards’ settings:

I like the cards’ ratio of 3×5, but you can change it to what you want. Depending on how much text there will be on the cards (I will talk about this later), consider checking the “Use small font” box and making the Size larger. Once you are happy with the way your cards look, click on the menu View -> Corkboard Options and check all three options:

This will make sure that your corkboard also shows the colors you defined above. Here’s an example:

Do you see the second card in the first row? It has two extra lines on the right: one red and one green. What are those? Those are Keyword markers. Basically, each piece of text allows the setting of one or more keywords. I use these to mark my characters. In my example above, Chapter 1 involves two of my main characters, Justin and Cora. Here’s how the definition looks like in the Meta-data panel:

To add new keywords, click on the + sign. If you want to edit a keyword’s color, click on that settings gear, which will take you to the keyword edit panel. Over there, you can double-click the color and change it.
So, by using this method, when you look at the corkboard at the manuscript level, you can have a broad view of your manuscript.
Scrivener Outliner
The outliner is the third and last way you can look at your manuscript. It looks like this:

You will have to do a bit of work to make it look like this. First, go to View -> Outliner columns and check on and off the ones you want. My structure is as you can see above. Note one difference between “Word Count” and “Total Word Count.” Word count is the count for that section, while Total Word Count is the word count for that section, plus all the sections under it. So, in the example above. Chapter 1’s total word count is 2,529, composed of the specific word count of four sections that belong to it.
I like this view because I can see where I am with the word count in one shot.
To edit each text section’s word count goal, open the section in the regular viewer and click on the icon in the bottom-right corner. Once you set your goal, the system will calculate the percentage of completion against that goal.

Scene Titles and Synopsis
The last step is giving my scenes titles and write the synopsis for each scene and chapter. As before, if you are not an outliner, you will do this at the end of your novel. Regardless, do it anyway. It will be a tremendous help later on when you have to write your synopsis.
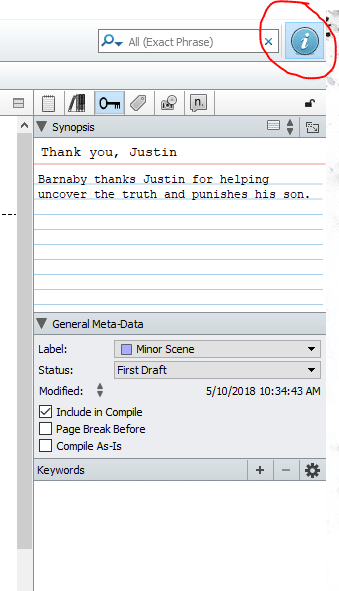
Keep your scene titles short and to the point. Something easy to understand in the context of the scene. You can see in the example above how I use things like “Justin is sad.” The synopsis text, though, is longer and more explicit. However, try to make it enough to fit on your corkboard cards.
Remember that the scene titles and synopsis text flows into all the views.
Corkboard:

Outliner:
![]()
Info Panel:

In a later article, I will discuss taking the metadata and generating a synopsis directly from the Scrivener compiler.
So, there you have it. Those are my best practices for setting up a visually helpful project in Scrivener that works well with any novel outlining tool, including my Master Novel Outlining Tool. If you are not an outliner, this method will serve you well at the end when you are starting the editing process.
Now, before you go, I have…
3 Questions For You
- Do you use Scrivener, and if yes, how did you learn about it?
- What other writing tools have you tried during your writing career?
- What are the biggest struggles with writing tools?
