UPDATE: I have posted an updated version of this tool: Master Novel Outlining and Tracking Tool V2.0. I recommend reading the update after you read this original post.
Have you ever felt tired and unable to write a single word in your masterpiece novel? Maybe you even have a rough novel outline, but you still feel stuck with your plot and unable to move forward. Or, perhaps you are unable to talk to your characters and understand them? If so, you are not alone. Thousands of writers around the world suffer from the same affliction. So, ask your doctor about Deprocrastinify and Ideastificator. Side effects might include…
Okay, I’ll stop the cuteness right there. We all know such magical solutions don’t truly exist. We all wish they would, but they don’t. So what’s a writer to do besides, well, write? I’m sure every writer has a set of tools they turn to whenever they’re stuck either with plot or characterization. In this article, I’m not going to reinvent the wheel. Instead, I will show you how I’ve used technology to simplify two related processes: the novel outlining and the word count tracking.
Why Do You Need A Novel Outline?
If you are a pantser, you probably think this is not for you. But wait, don’t run! I believe that this method to outline a novel will help you verify your structure after the fact, and, most importantly, it will help you with another dreaded task: writing a synopsis. Bah! Just writing the word gives me shivers—the bad kind. But, truly, I think this tool will help you too, pantser! Just read a little bit more.
So, what exactly is this? It’s a tool I’ve created using Excel that allows you to take one idea and grow it step by step into a full-fledged outline and scene list. It goes even further than that to character sheets and even family trees.
My idea is loosely based on the Snowflake Method by Randy Ingermanson. He took the concept of starting with a simple structure and growing it time and time again, like a fractal. He put that idea in a program called Snowflake. I still use it today, and I highly recommend it. As I said, it’s not a new idea; it’s just a different way to put it, which I believe is easy to use and gets you where you need to go fast. My method is a twist on that and works really well for people who like Excel, regardless if they are beginners or expert users.
At the end of this article, you can download a full blank template of my tool. Feel free to use it as you wish.
One last word: this tool, just like any other tool, is not a substitute for writing. Your novel won’t be made using tools but with writing. So, don’t get stuck in analysis paralysis and agonizing over your outline. Keep it short. The method I present here should allow you to outline a full novel in one weekend. One! I mean it.
So let’s dive into it.
The workbook is divided into worksheets that cascade from left to right, and each step brings you closer to the full scene list. Most settings transfer from one page to the next, so you only have to type them once. This blog post serves as the full user manual for the worksheet, but the sheet itself has an Instructions page at the start, which you can refer to.
If you want to follow along with the Excel file open, click below to download the Master Novel Outline and Tracking Tool for Fiction (MOTT). However, I highly recommend downloading the latest version from this post instead: Master Novel Outline and Tracking Tool V3.
MOTT-blank-v1
Novel Outline – Setting Things Up
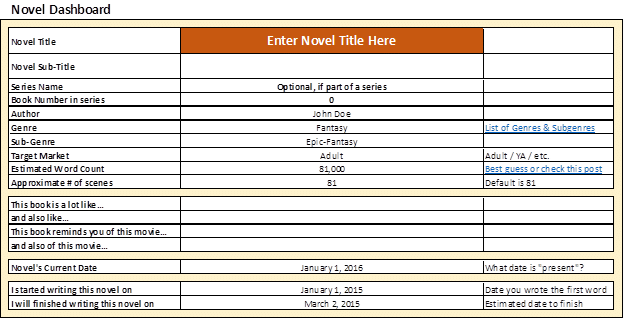
The first worksheet is called “Dashboard.” Here we set up your novel outline’s basic elements, such as name, word count, date, etc. This information is further used in the subsequent sheets.
Two important values here: the estimated word count and the present date. What I mean by the present date is the time when the action takes place in your novel. For instance, if your action happens in the ’80s, Jan 1st, 1985, might be the day. That present date is used to calculate the character’s ages. If your novel jumps all over the place, use whatever you think is most relevant here, some kind of date, to anchor your plot in time.
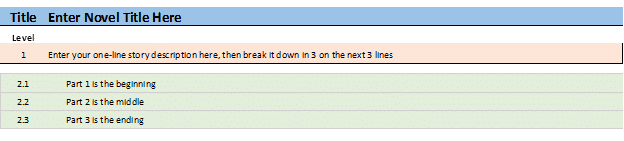
Part One – Level 9
In part one, you start with one sentence that describes your novel. Think along the lines of:
“A farm boy on a far-away planet journeys with a Jedi master to rescue a rebel princess and fight against an evil empire.” – Star Wars
“A boy wizard begins training and must battle for his life with the Dark Lord who murdered his parents” – Harry Potter (Thanks to Randy Ingermanson for this one)
Come up with the one-liner for your novel and type it in the first box.
Note the rudimentary word counter on the right. It’s designed to keep track of the word count in your sentences. Try to keep your outline sentences up to 25 words. Don’t go too wordy here.
If you want to learn more, read Rachel Gardner’s post ” Writing a One-Sentence Summary.”

Then, take that one idea and split it into 3 separate sentences. Think like this: beginning, middle, and end. Each sentence should encapsulate the story idea for those segments.
Now, take those 3 ideas and expand each of them into 3 more. Once again, think in terms of the same beginning, middle, and end, but this time take it one step further: the beginning of the beginning, the middle of the beginning, the end of the beginning, and so on. As you can see, creating your novel outline is basically a recursive exercise in which you keep unfolding and expanding ideas from the top down.

Now you have 9 lines of an outline. Let’s take it one step even further. Now, expand each of those lines into 3 more! I know it sounds hard and complicated, but it’s not once you give it a shot. It’s like unfolding your story, three steps at a time. The worksheet passes the clue right in front of your eyes, so all you have to do is read it again and then expand it into three steps:

At this point, you have a 27-line outline. This is a good start.
Part Two – Review Level 9
On the next sheet, I reorganize the 27 lines you came up with in Part One. Reread them from top to bottom. Does it make sense? If you were to read this to somebody, would they get the gist of it? Try it out. Read the current outline to a friend and see what their feedback is. On the right column, you will notice some hints for a possible 3-Act structure. This is definitely optional, but if your novel does follow the 3-act structure, this is a good guideline that hints if you are on the right track.

Part Three – Level 81
Can you guess what we’re doing in Part 3? I hope you got the pattern… We take each of the 27 steps from Part Two, and we split each into three sub-steps. It sounds awfully long and complex, but I believe that the way the spreadsheet shows it makes it user-friendly. The 27 steps you already have are on the left side. On the right, you get the 3 “splits.” Go from top to bottom and just expand each of them into three. At this point and depth, you are actually describing scenes in your novel.
Here’s a glimpse:

Part Four – Scene List
So, after the three steps above, you wind up with a robust novel outline consisting of 81 scenes. Before you move to analyze your structure using some other tools, simply reread your list. Ask yourself if this is the story you want to write. With 81 sentences, you can capture the basic idea and a minimal level of detail. If you craft this part well, you should have a decent, factual synopsis of your novel.
A few questions to ask yourself:
- Is there a clear beginning where you set things up?
- Is there a clear ending where you wrap all your plot and sub-plot points?
- Does the overall structure reflect the original one-line idea, or did your outlining take a whole new dimension? This is not wrong, but if it happened, go back and adjust your one-line or maybe even the 3-sub-steps of your one-line.
Make sure you don’t move forward until you are happy with how your one-line translates into your 81-scene list. You will thank yourself later when you have to summarize your novel into a short or long synopsis. Having done this work ahead of time will be invaluable.
A question you might be asking: what if you find that a certain step is too simple or too complex to break into 3 parts? If it’s too simple, you can leave blank rows. If it’s too complex, copy and insert new scenes where you need to. The links in the file will maintain, except for your manual scene, which will stand independent.
Here’s how the Scene sheet looks like:

Novel Outline – Scene Analysis
Once you’ve completed the 81-scene list, it’s time to start tweaking it.
A few columns follow each scene’s description. They allow you to categorize and tag your scenes in preparation for further analysis. Let’s take them one by one:
Chapter
This is the chapter number that contains the scene. You will fumble and play with this a lot, but it’s helpful to start grouping your scenes by chapter. You most likely want to do this last after getting a good sense of how things are coming along.
POV
This is your point of view character for that scene. Obviously, in a first-person story, this will always be your protag. In a third-person story, though, you should strive to have one POV per scene. This makes it easy for readers to be in the “shoes” of the POV character. If you do head-hopping because you are writing an omniscient POV, this field is probably useless.
Setting and Character
These are minor fields that you may consider using to give you a quick idea about the scene. In the characters’ column, type the name or initials of the people in that scene. In the Setting, just type the location where the scene takes place (“New York,” “kitchen,” etc.)
Major / Minor
Even though your novel can probably not exist without all the scenes (because you should never have useless or pointless scenes in your novel!), some of them will always be more important than others. You will probably find your major scenes at the beginning and the end and on the cusp between the beginning and the middle and between the middle and the end. Either way, there’s no rule about it. You must use your unique knowledge of the story to identify the major scenes. Making this distinction now will come in handy when you start writing. That’s because if you write your major scenes first, it will be much easier to fill in the gaps with minor scenes.
Purpose
Every scene in your novel must have a reason to be there. If it doesn’t, it does not belong in your novel. There are several reasons for a scene: Develop a Character, Advance the Plot, Describe Something. Figure out what is the reason for each scene.
Type
Active / Reactive: Every story has a sort of ra-ta-ta-tat-a rhythm that is not easy to describe but easy to feel. It’s a series of active and reactive scenes that, when stacked together, create this rhythm. An Active scene is when something happens to the POV, and a reactive scene is when the POV does something in response. It’s like a tennis game, and the reactive scenes are when the ball is in your court.
If you have too many active scenes one after the other, the story will feel like a bunch of stuff is happening to your character and them doing nothing. If you have too many reactive scenes, it will feel like your character is doing a bunch of things for absolutely no reason. You need to strike a good balance of action/reason followed by reaction/reflection. This will give your story rhythm. Tag your scenes and see if you had accomplished that with your outline.
Actual Words / Actual Cumulative Words
As you write scenes, you will fill in the Actual Words for each scene. This is optional but recommended. It will give you an overall idea if some scenes are too lengthy versus too short. Again, there are no rules. The only rules are those established by you and by your story. But I do find the guide provided by the actual word count useful.
Estimated Words / Estimated Cumulative Words
The sheet estimates the average word count based on the overall word count. This is simply a mathematical guideline, nothing to be too crazy about.
Actual Intensity
Each scene in your novel will have a certain level of emotional intensity. Major scenes and scenes around the climax and disaster will likely have very high intensity, while minor scenes will have lower intensity.
Your story should read like a roller-coaster, and the size of the ups and downs will depend on you. But the last thing you want is a flat lazy-river. Nobody wants to read that. Your novel needs to bring us up on a peak (which can be physical, emotional, mental, or spiritual) and then drop us back on a calmer road. And again, and again.
This is what intensity is doing for your story. There are literally hundreds of graphs out there that show the intensity charts. Your story’s chart will be different as it depends on your story. But, here’s a peek at an example from the web:

This shows a “standard,” generally acceptable structure of a story. Using the intensity column, you can plot your own intensity. Look at the Charts sheet to see how yours looks like.
After you finished categorizing all your scenes, take a look at the whole novel outline, and ask yourself these questions:
- Is there a sense of rhythm?
- Do enough reactive scenes balance the active scenes?
- Does the intensity make sense?
As I said a few times before, there are no real rules for creating a novel structure. With experience, you will develop your own style, and you will start dreaming this stuff up. But until then, I suggest looking into some standard structures that have been working for a very long time. I’m talking about the 3-Act structure and the general graph of intensity.
I won’t go too much into the details about why they are important (you can read yourself about the Three Act Structure and the Story Intensity Diagram). Still, this Excel tool uses those as a basis for analysis.
Tweaking
This brings us to tweaking. Read your novel outline one more time, but this time think in terms of intensity. You will probably find that your major scenes map to higher intensity moments, while your minor scenes to less intense ones. That’s obvious. Keep reading and tweak those intensities as you see fit.
As you make changes to your intensity, you will see that the Charts page’s graph will divide into two lines: the red line shows the story intensity for your own story, while the blue line shows the original, standard line. This will allow you to visualize how different your story is, intensity-wise, from a standard distribution.
Adding / Deleting Scenes
Now that you’ve completed this stage and are certain that your one-line translates well into your scene list and the scenes are properly categorized and assigned an intensity, it’s time to see if anything is missing.
If you did things right, you would most likely not have to delete anything, but you might have to add something. Let’s say that a certain concept that you split into 3 scenes really needs four or five or more scenes. What do you do? Well, simply insert lines in the place where you want to add scenes and write manual scenes. The formulas that bring the cascade of outline elements will be preserved, but your manual scenes will stay fixed. Perhaps you can mark them with a different background color to make sure it’s obvious they’ve been inserted.
Word Counts
In the beginning, you set your story’s word count, and the scene count defaults to 81. By default, the sheet will divide your word count equally between the scenes. If you’ve added manual scenes in the step before, make sure to edit the number of scenes in the dashboard, so the system properly determines the average word count per scene.
Novel Outline – Additional Tools
Character Template Sheet
When creating your novel outline, I find it critical to learn more about my characters and develop them. Sometimes, it’s best to describe your characters before you start outlining. Learning and discovering who they really are will give you new ideas for your plot.
To help with this, I’ve added two Character Worksheet templates—one for major characters and one for minor characters. Both include a list of basic things about your character, as well as a list of questions and answers that will help you shape your character in multiple dimensions.
I suggest duplicating the major character template sheet and have one for each of the following characters:
- Main Character (Protagonist)
- Antagonist
- Sidekicks
- Other important characters
All minor characters, or at least most of them, should get a minor character sheet.
Each major character sheet also has a place for you to set the Myers-Briggs Personality Indicator’s value. Based on a survey you must fill in as your character, this value describes your character’s overall personality traits. So, answer all questions the same way your character would answer them, and you will get their indicator. If you want to learn more about this technique, read my blog post on creating memorable characters.
Character Genealogy
You can’t have a novel outline without a lot more details about your characters. For me, it’s always important to know a lot about my characters before I throw them into action. Most of the time, the reader will never get this information. But it’s important for me to know because it allows me to develop that character and understand how they would react in different situations. For this, I am using a simple tree-like genealogy chart. With it, I can take one character’s family history all the way to their great-grandparents.
I know it’s a kind of unilateral and simplistic view of life. In reality, people divorce and die and remarry and run away and kill each other. But here, with this genealogy tree, I am just trying to get a snapshot of my character’s family history at some point in time.
Feel free to delete this if you don’t use it or duplicate it for more characters. I usually like to create one for my protagonist, antagonist, and sidekicks. It makes my characters feel more realistic and gives them their own history.
To use this, simply fill in each person’s name, their place and date of birth, their place and date of marriage, if any, and their place and date of death. On the right side, the sheet calculates each person’s age (as relative to the Present Date you set in the Dashboard), and the person’s age at death, if applicable. For characters who are dead already, the Age can be interpreted as: how old would this person be if they were still alive today.
A little Excel quirk: if you need to use years before Jan 1, 1900, the age calculator will not work.
Word Count Tracker
The last tool in this worksheet is a word count tracker. Although it is not directly required for your novel outline, it’s useful to help set your writing goals and track your progress. It’s pretty self-explanatory—simply type your writing session’s date, followed by the total word count after you stopped writing. The sheet will compute your session’s word count and the percentage of completion:

On-Going Usage
Once you are done with this worksheet, you are ready to start writing!
As you do, remember to adjust:
- Word count as you advance through your story.
- Scenes’ actual word count (which will drive the word count in your chapters).
- Chapter assignments as you complete scenes and decide if they belong here or there.
Novel Outline – Final Thoughts
As I was hinting in my intro paragraph, this is just a helper tool. It will not work for everybody, and, most importantly, it will not work for every type of story. If you have many parallel sub-plots, this tool might not be the best for you (unless you create one sheet for each subplot).
So, try it out and see if it works. If it doesn’t, I hope something else does… If it does work, let me know; I’d like to hear about it.
Download The Novel Outline Tool
Please click below to download the Master Novel Outline and Tracking Tool for Fiction (MOTT) without further ado. However, I highly recommend downloading the latest version from this post instead: Master Novel Outline and Tracking Tool V3.
MOTT-blank-v1
Feel free to use these at your own leisure, modify them, and share them in any way, shape, or form. However, I’d appreciate it if you left my credit and links in the dashboard. Also, if you share it on your blog, please link back to this post. I’ll appreciate it.
Now, before you go, I have…
3 Questions For You
- What do you like and/or hate about this novel outline method and tool?
- How would you improve it? What would you add or take away?
- What other methods and tools do you use for your novel outlines?
